


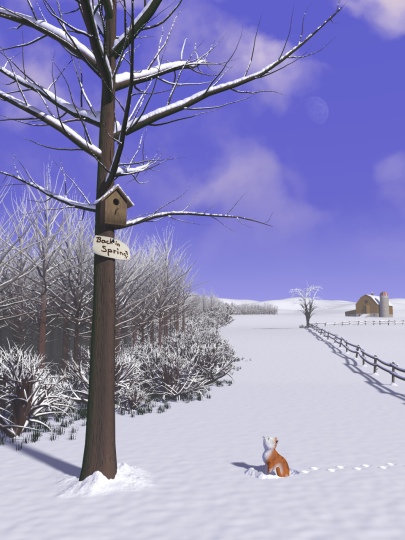
"Miss You (when you're gone)"
This image was made as a christmas present for a very close friend of mine. She
had wished for an image with an animal leaving marks, e.g. footprints in the sand,
or bent grass-blades. Her family owns a cat and it was winter, and thus, the basic
requirements were found.
The rendering at 3840x5120 for a print took 3 days and 2.5 hours with a maximum
memory usage of 272 Megabytes. The required rendertime set a new personal record for
non-technical images! Nowadays, it renders in a mere 11 hours on a laptop...
In the following, I will be explaining various technical details of the construction
and composition of the image.
Index
The Message
The Foreground
The Snow
The Background
The Sky
The Message
In my images, I always try to convey a certain message. Special care is taken to make sure
that several aspects can be discovered, which elevates the understanding for "insiders".
Some background information might be helpful: In this case, the person for which this image was
made is a very close female friend of mine. Others are often hesitant to believe that she and I
weren't having an affair (or at least were planning on having one) or assumed that there's more going on than we
admit. It seems that there's this stereotype-thinking that men and women can only have a
relationship somehow based on sex and attraction.
Anyways, at first, I had a difficult time pinpointing an idea for an image. I wanted to somehow
visualize our friendship along with making a great image which would enhance my knowledge
and understanding of POV-Ray and break new grounds for future images.
During a boring course at my university I scribbled on my pages, trying to draw a rough blue-print
which I could use to model the cat with a blob. One of the sketches showed a sitting cat looking
slightly upwards, like it was waiting patiently for her owner to feed it. A few rough lines aside
it sparked the idea of a tree, and the idea for a bird's nest (which eventually got replaced by a
birdhouse, because the nest wasn't very visible from the image's perspective) quickly followed.
In essence, a cat waiting in the snow on a cold mid-winter day for a bird's return is a cute
thought, but it also touches on the above mentioned stereotype that men and women can't be plain
friends: who would think that a cat becomes a bird's friend (or vice versa, for that matter?).
The Foreground
The main objects of the image which tell the story are the cat and the tree with the bird's house. The snow in the foreground also required a small script.
The cat is a set of blobs
modelled out of several spheres and cylinders. If I had attempted
to place all components in a single blob, I would have had difficulties keeping the parts
seperated. Instead, I use several blobs which used the same components at the places where
the blobs would meet.
Texturing the cat is a small script in itself. Just slapping a bozo pattern onto the model
wouldn't have resulted in a proper pattern suitable to a cat. Combining patterns in order
to follow curves and localize certain patterns would have become quite tedious and complicated,
as I would have had to work around layered textures. POV-Ray has this limitation that you cannot
layer textures of patterned textures. My solution to this was to use the object-pattern, which
colors everything inside a given object with one color and everything outside with another. So,
in order to color the back of the cat, I shot hundreds of tiny spheres onto the cat-model,
blobbed this and used it as a basis for the object-pattern. Converting the pigment to a function
allowed for some further modifications with the color-maps, e.g. blurring the border to get a
soft gradient from the white fur to the red/orange fur. To create a fur-like texture, I had
to apply a trick. Fur has a similiar lighting effect to that of velvet, surfaces in a certain
angle towards the light and the viewer shine more than an area that are perpendicular to the
viewing direction. To achieve this, I applied a very turbulent normal and averaged two textures:
one with a high specularity value, and another one with a slightly less specularity and
inverted colors. The larger specular shine on the "positive" texture with the smaller shine of
the "negative" shine resulted in a specular ring, where the actual specular hotspot was removed,
but the outer rim still kept. The result is (at least for objects that are not too close to the
camera to reveal that there is no real fur) quite convinving in my oppinion.
The bird's house is a rather
simple CSG object with a handcrafted texture which is aligned with the broad section of the
wood-parts. The sign beneath is a bicubic-patch with manually modified control-points. For a
more "untidy" look, I didn't use a font to write the text, but instead drew the text by hand
with the mouse, and uv-mapped the result to the patch. The tree was created using Arbarao, a
freeware tool which exports meshes. Some manual tweaking was required to get the tree look like
I wanted it to.
Lighting the tree was an issue by itself. Using arealights can slow down the rendering process
significantly. Add to that a complicated object like the large mesh used for the tree, and it
will take forever. Additionally, an arealight can create artifacts when the adaptive settings
aren't set detailed enough. To cut down on the rendertime and use less complicated arealights,
I resorted to lighting the tree (and the objects attached to it) with shadowless lightsources
in a lightgroup. To get shadows back onto the objects, a negative light was projected through
the objects, essentially creating a "shadowlight". Finally, a cone was placed inside the tree
using the no_image keyword, so that it appears like the trunk throws a soft shadow with the
foreground area-light.
The foreground snow was modelled using function-turned pigments. What I needed was a method to stack some snow as well as stamp footprints into it. I also needed to have flexibility for the resolution of the heightfield along with the possibility to quickly change and modify the distance between steps or their size, in case I change the size of the cat or such. This was the first time I actually worked with functions to achieve a specific effect and I hope to gather more experience with further images, as I think that functions can be quite a powerful tool. For this image, a small script would take my input and multiply and/or add functions with/to each other. It was rather simple set of macros which basically took care of "stamping" footprints into the snow and creating the small piles for the cat and the tree. The foreground snow ends roughly where the fence begins.
The Snow
The snow on the foreground tree and bird's house a new set of Macros originally designed for
this image. However, they quickly evolved into something bigger and more generally useful and
thus lead to the release of the Surcoat-Macros. They
take care of efficiently covering an object with samples and getting rid of unwanted ones.
Especially for the tree there were some issues, as Arbaro creates a tree of which the triangles
of the branches stick into the trunk. The samples inside the mesh had to be removed, along with
shooting tons of samples onto the tiny branches. Another set of macros then use these samples
and further parses data to model a layer snow which stacks at walls and has a few settings to
control minimum size for snow-particles and such. For example, the wall-check scans a hemisphere
above the particle using trace() to collect data of the particle's vicinity. Dependant on various
settings a height is calculated for the particle, which, when applied to several neighbouring
samples, leads to the impression of snow being stacked and accumlated against walls.
The macros were applied to the tree and house, but not on the fence. The fence has a hardcoded
layer of snow which places blobs onto the vertices of the beams and spheres on the top of the
poles.
On every other surface the snow is actually just a texture, the trees and bushes only have a
slope-map to apply snow to upward facing surfaces, and the barn's roof is textured like snow.
The Background
Beginners often make the mistake of rendering detailed foreground objects, but putting little
to no work into the background. With some artistic style, this can be pulled off properly and
look great, in most cases, however, you end up with a simple "spotlight on object" image.
The clue for outdoor images is to properly position the horizon and (something very important
for POV-Ray Users) get rid of the horizontal line a plane creates. Place some mountains in the
distance, block the horizon line with cars, houses, trees, whatever, but *please* don't make
it obvious that the ground is a simple, boring plane.
For this image, I've decided upon smoothly sloped hills in the distance, achieved with a simple
heightfield and a handmade function-turned pigment to adjust the hills. This alone would have
been too little and boring, and I needed to further break it up. Especially with the tree in
the foreground, reaching out and above the frame of the image, a simple rolling hills landscape
wouldn't suffice. The tree quickly lead to a forest, which is made up of 4 trees, rotated about
the y-axis and positioned pseudo-randomly to properly fit the viewing area. Bushes and grass were
added to the closer forest-edge for further realism. Unless it is a planted forest, trees seldomly
stand all by themselves...
With the forest to the left, the right half of the background-snowfields still were an open
expanse which needed to be filled. Although a certain emptiness underlines the solitude and
loneliness of the cat (also positioned in the right side of the image), one shouldn't overdo
it. Instead of placing yet more trees, I decided to script a fence-macro which would take
a beginning and an end position and randomly generate poles and beams. Two of these fence-lines -
along with a large tree and some bushes at the corner where they meet - nicely filled the expanse
visually whilst still retaining some of the open atmosphere in this side of the image.
Nontheless, the horizon was missing something, the entire image was weighted more on the left
side, as many more objects were placed there. My first thought was a distant small town with a
church, but a few quick tests quickly convinced me that the effort of creating a fairly realistic
though low-detail town would take longer than I had time. I ended up with a barn, which was a
useful suggestion my father made. Googling for a few barns I found a nice reference pic which
was the base for the simple CSG background barn.
The Sky
One of the things my friends like most about my images are the media-clouds. I spend hours
on picking the correct patterns, combining them, turbulencing them properly, setting sufficient
sampling and, above all, coloring them properly for an artistic impression. Although I often
look at the source of older clouds, I *never* just plug in the same settings or do a quick and
dirty "copy-paste" job. The clouds for all scenes are always handcrafted for the image.
At first, I wanted to have a pure blue sky, to have some contrast in an otherwise more or less
white image. As a measure for love of detail I placed the moon.
Now, the moon-texture wrapped onto a sphere would normally result in a sphere hanging in the
sky with a black rearside. How did I manage to fade from moon to blue sky? It's simple, although
a little tracing intensive: the sky is actually a small shell filled with colored emission media.
Near the horizon, it is colored more white and a gradient takes care of fading to blue. Since
this effect isn't really complicated, very few samples were sufficient (actually, 1 was min and
3 was max) to just get the blue color onto the sky. Thus, the black background color and the
black shadow of the moon are taken care of, where many would otherwise have used the simple
sky_sphere, which of course does not have this "special effect".
The clouds are yet another layer in front of the sky-shell. As the shell is hemispheric, but the
ground is not, I had to take care that the clouds don't look like they were mapped onto a
hemisphere, but not overdo it to have it look like I've just placed a plane at the end of the
hills and textured some clouds onto it. The turbulence had to be just right as well as the
thickness and color. Important was to get a more vanilla color than yet another shade of white,
and avoid creating too prominent clouds which would attract the view.
Another final note concerning the rendertime for the sky: one might think that the clouds, made
of high-sampled scattering media, required most of the 74.5 hours rendertime, but the sky in
fact rendered slightly faster than the remaining image. Why? Because I've used an arealight to
light the forest, and now imagine how intensive tracing arealights through thousands of complicated
trees is...